|
Aw, the time has come, my last baking post before I graduate. The growth I have shown throughout the last two years has been immaculate. I have become so much more confident in the kitchen with my measurement conversions and overall techniques. I always used to question myself even when following a recipe and end up asking for help and now I can tend to figure it out. When watching my favorite baking show with my dad (British baking show) I often saw them make Danishes(somehow in like 3 hours) and always wanted to try, so thought now is my chance. You can click here for the recipe I used, I followed an Anna Olsen recipe with a YouTube video along with written instructions which I tend to have better luck with. Last year when making my st. Honore cake I used frozen puff pastry and this year wanted to make my own pastry since I didn't get to last year. When making this my first thought was how is it different from a puff pastry? Turns out a Puff pastry use steam to rise, where as Danish dough is used with yeast to leaven it. It makes sense considering that puff pastry is cooked at a much higher temperature, this reminded me of our sourdough bread and how it also partly uses steam to rise (Dutch oven). The first and most important step when making Danish dough is the laminating. There are two ways of doing this. First way is rolling out the cold butter into a rectangle and then folding the dough creating layers until combined. The second way is similar to puff pastry, you cut the cold butter into cubes and add into the dough and then fold to combine. Either way the cold butter is getting layered into the dough creating nice flakey layers. In class when making biscuits I learned that keeping the butter as cold as possible is best for flakiness which I applied that technique when making this dough. Some tricks we learned in class was to handle it as little as possible and use saran wrap instead of our palms or hands. The second new skill I learned when making this was folding. The first fold I used is called the book fold and then after I used the thirds fold (as seen in my YouTube video). Folding is the key when making any pastry. Between each fold the dough had to rise for about an hour. At first I thought it was strange that the recipe wanted the dough to rise in the fridge since most recipes say a warm place, The reason for this is to make sure the butter will not melt by the next time, I need to repeat the folding and rolling process again. Lastly, I had to make my fillings. Since I knew I was going to have some left over dough I made one of them more like a strudel and made an apple filling for that. For the Danish's I made a lemon curd filling. I haven't actually made anything like this before so I struggled at first knowing when it was thick enough. I waited about 10 minuets and it still had no change in consistency, so I turned up the heat. At first I was scared that I was going to cook the egg (much like when we had to put the egg in hot milk for the cinnamon buns in class) I just didn't want it to curdle which it thankfully did not. To reflect on my results, and critiques from my family there's a few things I would change for next time. For the lemon curd, I should have tried it before putting it in the fridge because it was a little sour, next time I would add another 1/4 of cup of sugar into it. Another thing I could of improved on was my apple filling. For next time I should of added more cinnamon as well as used a thickening agent such as corn starch so the sauce from the apples didn't leak into the dough causing it to be a little soggy. Over all, I am so proud of myself for what I accomplish. This recipe took a lot of time management as it took about 9 hours to complete just the dough (2 days in total). I also loved the creativity of making all the own designs, I used this YouTube video to help me out with it. I can't wait to try this recipe again with different fillings and maybe textures such as nuts! Hope you enjoy my YouTube video of the process :) Timeline: Monday- Find recipe and convert measurements Tuesday- Make dough Wednesday- Make fillings and bake Thursday- Blog final
0 Comments
Somewhat a disappointment, I was expecting this cake to turn out super moist just like the cupcakes. It sadly was quite dry and I prefer chocolate as it has more flavor. I think it was dense because I either over cooked it or over mixed it because I still used buttermilk and alternated the wet and dry ingredients. My buttercream turned out great and I also wanted to try something different so I made strawberry buttercream. I was planning on using red food coloring on the cake yet couldn't find it and had to go with green. I tried to practice with the tips I had at home and did a simple ring around the outside, and sifted some icing sugar over the top for decoration. Next time I would put a thicker layer of buttercream in between the two cakes yet however my family really enjoyed the strawberry flavor addition to the buttercream.  MMM, so good! Firstly chocolate cupcakes are way better than vanilla. This recipe was super moist considering most cupcakes I have tried tend to be dry. I think this may have been because we used buttermilk which would tenderize the gluten in the flour. I also tried a new technique that I have never used before. I did not know that you were supposed to alternate the flour with the wet ingredients, prevents milk from curdling. The trick to making light and fluffy cupcakes is to not overmix, much like muffins. At first, I was struggling with using the tips to ice the cupcakes. After being shown how to hold it properly, and to pull away quickly so it doesn't turn into a glop, I was much more successful.
oh my goodness...so good! I make cinnamon buns all the time but they never taste like this. During class today, we made the cinnamon bun dough. It was quite an easy recipe to follow along with but used new techniques like "scalding" milk. It was also great practice scaling the recipe to the appropriate amount. From the Pictures you can see that the yeast activated super well as it almost tripped in size and became all foamy. When I cut the rolls I learned to use floss so that it pulls the layers together when cutting it cause whenever I used a knife it would tend to fall apart on me. After I proofed them at home for another hour they almost doubled inside. The next weekend, I made another patch and since I prefer without icing. I pour condensed milk or heavy cream with some sugar while it has about 10 mins left in the oven. You can see the difference, my other ones tasted dry compared to this batch. I have also tried using different fillings such a peanut butter/jelly but did not enjoy it as much. 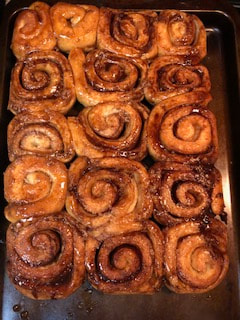 Wow, what a long process. When I was first researching how to do this I realized that there is two ways. The video we watched in class, made the leavener and the dough all in one go right away where as it the pdf recipe on the class blog made the leavener separately and than the dough. Anyways, I went off of the video recipe because I found it was easier to follow along with. I liked learning the new technique called the claw to mix the ingredients, however looking back at my results, the dough was super duper dense. I think this may have been because my sourdough starter was not strong enough to rise the dough or I didn't kneed it enough to develop enough gluten. It never developed the same consistency as the video and had trouble rising. I've learned from the recipe that it probably takes awhile to master a perfect sourdough bread but I'm glad mine still turned out decent although it was very dense. Last week, I made Yorkshire puddings to have with a roast my dad was cooking. If you are unfamiliar with them, they are a common English side dish with batter made from eggs, milk and flour. The first time I made these around Christmas they weren't quite how I wanted them to turn out. What I learned from the last time was to get your oil super duper hot - this helps them rise since there is no baking power or soda in the recipe. Secondary, cook them more than you would think. Last time I thought they were done but minuets later they collapsed. The trick is to wait until they are fulling brown on top. Next time I made this, I am hoping to use my sour dough starter. At home I made Caramelized onion and chive biscuits (king author recipe) with my sourdough starter since I had to remove some, The other biscuits are plain ones we made at school also using our starter. The onion and chive ones I made at home seemed to be my favorite out of the two just because of the extra flavor that got added. When I made them I used kosher salt instead to add another bite of texture. The did turn out as the flakiest biscuits I have ever had but should of used the cutting technique that I used with the plain biscuits. To cut the onion ones I used a pizza cutter and the plain ones we used a round cookie cutter. I think the plain ones rised better because the cookies cutter was sharper providing a clean cut that didn't push down the sides of the dough. In addition to the two types of biscuits I have made from this website, We also made waffles using our sourdough starter. At first, I was a little worried because I was almost convinced my sourdough starter was dead yet appeared to work. Quick breads that don't require yeast such as pancakes and waffles normally contain baking power used to help them rise. Since sourdough starter can be used as a leavening agent it can be used to replace baking power or soda in quick in a recipe like this. The waffles we made turned out great and did not really taste like sourdough at all, most likely cause we used such a small amount. Next time I would love to try this recipe again but use a Belgium waffle maker. 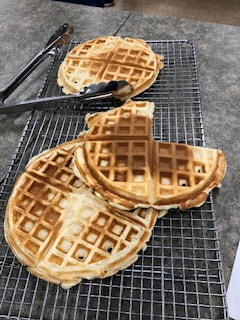 mmmmm! This must of been the easiest bread recipe I have made. In class we started making the recipe for this "No-kneed bread". After the ingredients got mixed together I jus put it in a plastic bag and let it sit overnight still I was ready to bake it the next day. As you can see in the third picture it was ready to go the next day because the gluten activated and it was super bubbly. To bake it, it was my first time using a Dutch oven. I did not have one at home but just used a pot instead, I was worried that the bottom might burn from the copper in the pot so i put a cake pan inside to act as another layer to prevent burning. Next time, I would love to try scoring the bread to make a pretty design, but overall this bread was super easy and tasted delicious. yay! very successful compared to last year.
I started this in class, making sure to use a very clean jar. I then added 1/3 cup of water and 2/3 cup of flour. I learned that you have to have the exact ratio of 1:1 in weight in order for it to ferment properly. By the third day it almost doubled in size and became super bubbly on top, by this point I had faith it was working! Looking back at my last year one that was pretty much a fail, I think the problem was that I did not use distilled water and maybe the chlorine had an effect on it. I did also realize that by the 8th day it gets a lot harder to keep it alive, its best to remove some starter. The science behind it creates micro-organisms such as wild yeasts and bacteria that live in the flour and activate gluten which causing it to bubble and expand (trapped gas). Its pretty neat that you can substitute it in almost any recipe. |
About MeArchives
January 2021
Categories |
||


 RSS Feed
